Knowledge Base
Elevate (Legacy Pro) differs from other RxTro plans because notifications are enabled by default. This feature is designed to help you identify earlier opportunities and bring bookings forward.
Below is a guide to understanding and managing Elevate
effectively.
Notification Scope
-
You will only receive notifications for users who are part of your assigned territory.
-
This ensures all alerts are relevant and aligned with your coverage area.
Managing Notification Volume
If you are receiving too many notifications, you can customise them at an individual customer level:
-
Navigate to the My Customers tab
-
Select the relevant customer & click 'Options'
-
Adjust notification settings based on your preferences
This allows you to control alert volume without losing visibility where it matters.
Cancellation Notifications
Notifications are triggered only when a cancellation occurs earlier than your next booked appointment.
Examples:
-
If you have an appointment booked in April and a cancellation occurs in May, you will not receive a notification.
-
If a cancellation occurs in February, you will receive a notification, as this creates an opportunity to move your appointment forward.
Best Practices
To get the most value from Elevate:
-
Ensure you always have future appointments booked with your customers
-
For customers you do not plan to meet:
-
Turn off notifications, or
-
Remove them from your customer list
-
Evidence shows that users who actively manage their notifications and appointments are able to bring bookings forward by an average of 60 days.
Why list your products on RxTro?
As a pharmaceutical representative on RxTro, you are already acquainted with the shop orders GPs place in primary care settings.
The Manage Products feature simplifies how pharmaceutical representatives and sales managers showcase products on RxTro. Each product listing creates a dedicated information page where doctors can review product details and, soon, raise shop orders directly from the product page.
Listing your products on RxTro helps:
-
Improve product visibility among primary care doctors
-
Make key information easily accessible in one place
-
Support faster and more informed ordering decisions
-
Strengthen engagement with clinics already using the platform
When you list a product on RxTro, your organisation's team members can see it on the platform. This allows for easier collaboration and ensures product information remains accurate and up to date. Authorised users may make updates where necessary.
What do I need before listing a product?
Before starting the product listing form, please ensure you have the following ready:
-
Correct product name and Australian-approved name
-
Product image (ensure you have the rights to share it)
-
TGA indications
-
PBS information (if applicable)
-
Conditions treated
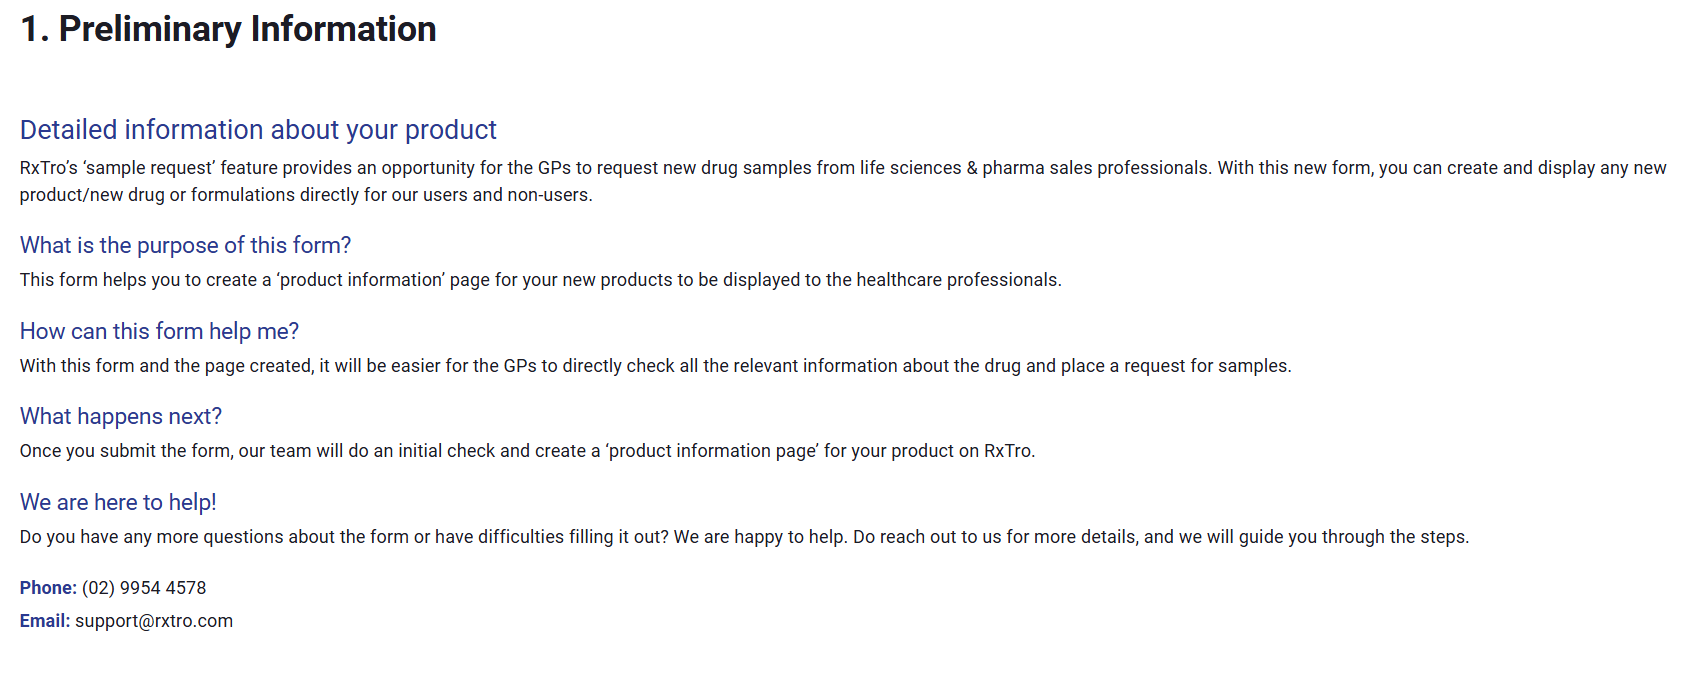
How do I list my product on RxTro?
Step 1: Access Manage Products
-
Log in to your RxTro account
-
Navigate to Products & Services
-
Click Manage Products and select Create New Product
Read the preliminary information and click Next to proceed.
Step 2: Add product information
You will be directed to the product form, where you can:
-
Upload a clear product image
-
Enter TGA indications and confirm PBS scheduling (if applicable)
-
Add a brief product overview
-
Include a URL linking to your company’s official product page
Ensure all information provided is accurate and up to date before proceeding.
Step 3: Declaration and consent
-
Review the declaration
-
Select 'I agree' to provide consent for displaying your product on RxTro
-
Submit the form
Once submitted, our team will conduct a brief QA review before publishing the product on the platform.
Quick note before you finish
|
Do you have a CPD programme to deliver?
We are here to help.
Whether you are a specialist or a life sciences professional delivering CPD content to GPs in primary care clinics, RxTro helps you connect with doctors through a single platform.
The first step is to create a Programme Profile, a dedicated page that outlines your CPD activity and makes it discoverable to clinics and doctors on RxTro.
Why do you need a Programme Profile on RxTro?
Creating a Programme Profile allows you to:
-
Showcase your area of interest and specialisation
-
Present your CPD activity alongside your professional profile
-
Increase visibility and outreach to doctors in your target locations
-
Make it easier for clinics to understand what your programme offers
As RxTro evolves, we plan to enable two-way communication, allowing GPs to:
-
Review CPD content
-
Express interest
-
Schedule CPD sessions directly through the platform
What do I need before creating my CPD programme?
Before starting, keep the following information ready:
-
A programme image (optional)
-
Programme details (e.g. duration, accreditation status)
-
Learning outcomes
-
Mode of delivery (remote, in-person, or hybrid)
How do I upload my CPD programme?
The form is self-explanatory and includes step-by-step guidance throughout the process.
Step 1: Navigate to Manage Programmes
-
Log in to your RxTro account
-
Go to Products & Services
-
Click Manage Programmes
-
Click 'Creae new Program'
After reviewing the preliminary instructions, click Next to begin.
Step 2: Enter programme details
You will be prompted to:
-
Upload a programme image (optional)
-
Enter programme details such as title, outcomes, and a short summary
-
Specify whether the CPD activity is accredited
-
If Yes, fill in the accreditation details
-
If No, proceed to the next step
-
You can also select your preferred mode of delivery (remote, in-person, or hybrid) to help clinics understand how the programme can be delivered.
Step 3: Define focus areas and duration
-
Select the key focus areas of your CPD activity
-
Enter the activity duration
(This should include delivery time, reviews, and outcome measurement where applicable.)
A quick note before you proceed
|
Step 4: Review and submit
Once all details are filled in:
-
Review the information carefully
-
Click Finish to submit your programme
What happens next?
-
Our QA team will review your submission for completeness, clarity, and accuracy
-
The programme will undergo spell checks and quality review before your Programme Profile is published on RxTro
If you’re moving to the Elevate (Pro) plan on RxTro, whether from another plan or a previous setup, this article explains what to expect after the transition.
Elevate (Pro) includes all core RxTro functionality, along with additional features designed to help you stay informed about clinic availability, act quickly on new appointment opportunities, and manage bookings more efficiently.
Below, we outline what remains available, what’s newly enabled, and how these added capabilities can support your day-to-day use of the platform.
What stays the same when you upgrade?
When you move from Essentials to Elevate (Legacy Pro) on RxTro, you continue to have access to all core features, including:
-
Viewing clinic profiles
-
Browsing available appointment slots
-
Booking appointments with clinics
-
Managing and tracking your scheduled appointments
All existing Essentials functionality remains fully available in the Pro plan.
What’s new in the Elevate (Pro) plan?
Elevate builds on the Essentials experience by introducing priority alerts that help you act quickly when new opportunities arise.
1. Cancellation notifications
Cancellation notifications alert you when a previously booked appointment slot becomes available due to a cancellation.
Why this matters:
-
If you couldn’t secure an early appointment
-
Or if your current booking is for a later date
You will be notified as soon as an earlier slot opens up, allowing you to book it immediately and move your appointment forward.
2. New clinic alerts
With Elevate (Pro), you also receive notifications when new clinics join the platform and open their appointment slots.
This allows you to:
-
Be among the first to know when new clinics become available
-
Book appointments before slots fill up
-
Expand your reach to clinics not previously accessible
Why choose the Elevate (Pro) plan?
Upgrading to Elevate is ideal if you want to:
-
Secure appointments sooner
-
Stay informed about cancellations in real time
-
Get early visibility into newly onboarded clinics
-
Make the most of all core RxTro tools with added priority features
Check our Pricing page to learn more about what's included in your Elevate plan!
RxTro's new 'Manage Practitioner' feature or form is the first step towards creating your 'specialist profile' on RxTro.
The form is self-explanatory and will take you through a set of steps to create your profile on RxTro. Before we begin with the details, let's understand the significance of creating the specialist profile and how it can impact your future healthcare collaborations and GP appointments.
Why create your specialist profile?
We have all created our online profiles one time or another. From Facebook to LinkedIn, there are several social media apps that put up our profiles online for everyone to browse through. Despite their differences, the specialist profiles on RxTro serve as a means to increase your visibility and reach.
Simply put, when your profile with all the details is on the platform, it's accessible to all the GPs and practice managers of the primary care clinic and the general visitors to the platform. For instance, a simple Google search (or searching on RxTro specifically by the 4000+ primary care clinics or their admin staff) on the conditions treated will help them land on your page, with all the details about your availability and point of contact.
So, when a GP or the admin staff search for a specialist with a particular area of treatment, they can easily find you or your practice on the platform to refer their patients.
How can I create my specialist profile on RxTro?
Here is a quick checklist of the things that you need before you start creating your profile on RxTro:
-
Your RxTro credentials: User ID & password
-
An active licence to access the platform (at least a basic licence).
- Your AHPRA number (to populate your details on our page)
- A picture (we follow all security protocols for image display)
- A short bio to get to know you better
-
Your availability, such as times and days in a week.
Once you have all of these handy, you can start to fill up the form by following the instructions below:
Step: 1 Navigating to the new feature
- Log into your account and click on 'Products & Services' from the menu options.
- Click on 'Manage Practitioner' and 'Create New Specialist Profile' tab to start filling up your form.
Step: 2 Form for creating specialist profile
- Read the preliminary information and click 'Next' to fill in your details.
- Upload your profile picture and your AHPRA number to populate your details.
- Cross check the information and enter additional details, such as your bio and contacts.
-
Add additional details such as:
-
Bio
-
Contact information
-
Availability
-
-
Tick the consent declaration to publish your profile
- Once submitted, your profile undergoes quality checks and verification to ensure accuracy and compliance.
What happens after submission?
After successful verification:
-
Your specialist profile goes live on RxTro
-
GPs and clinic admins can search, view, and contact you
-
Your practice becomes easier to discover for relevant referrals
Effective communication is paramount for any organisation, whether they're trying to convey a very dynamic message about a product, a therapy area, or just introducing their services. Recognising the limitations of traditional, fragmented methods like faxes and face-to-face communication for event promotion, RxTro is excited to introduce its innovative Events Module.
RxTro has designed this powerful new feature to modernise your audience's connection, drive engagement, and foster collaboration within the medical community.
Simple and Flexible Event Creation:
Creating events with RxTro is intuitive and adaptable to your needs. Whether you're hosting a face-to-face meeting or an online webinar, the module allows you to easily:
-
Nominate the specific time and day of your event.
-
Clearly specify the online or face-to-face format.
-
Provide comprehensive details using a free-text field for agendas, speaker biographies, and other essential information.
-
Seamlessly link to your existing registration page, allowing you to maintain your preferred internal processes for RSVPs and sign-ups.
Are you prepared to learn how to incorporate your events into the RxTro platform? Here is a step-by-step guide to adding events on RxTro:
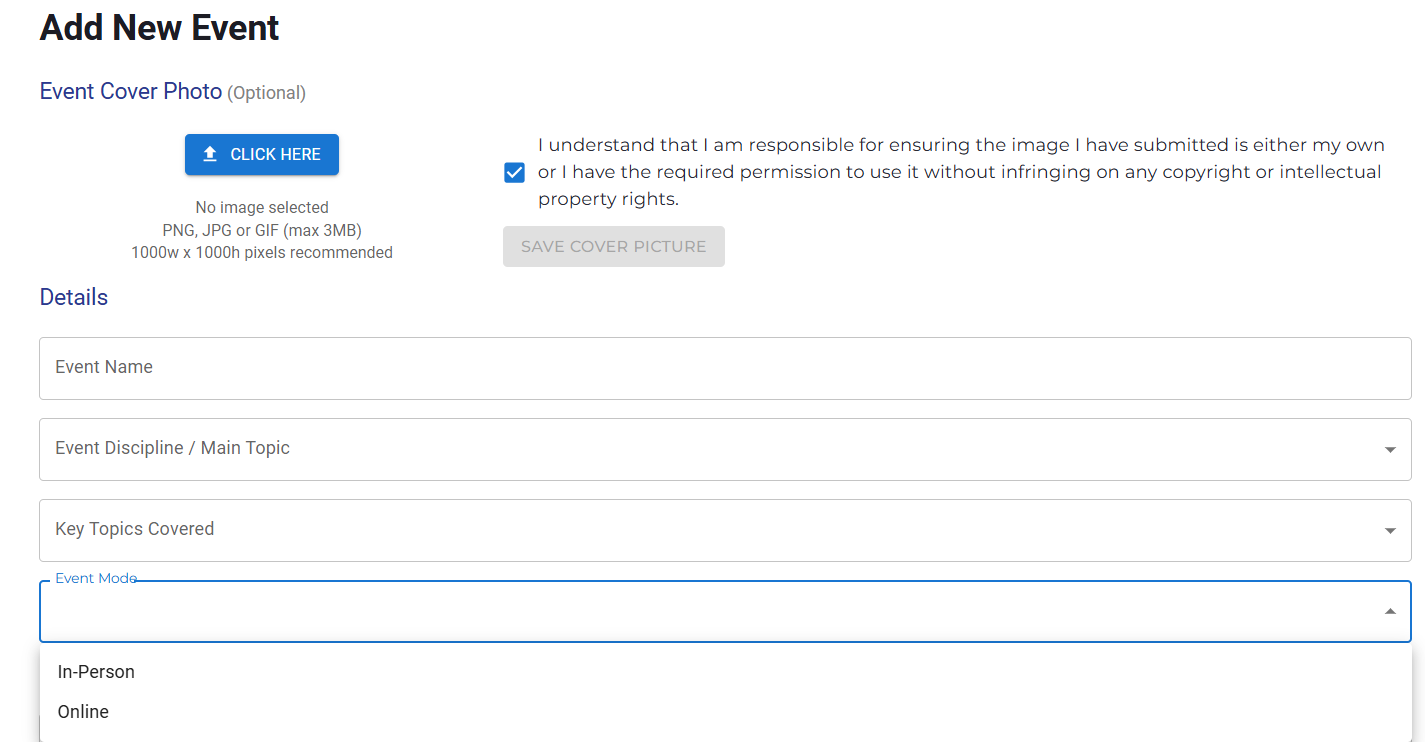
Step 1: Accessing the Event Creation Form
To begin setting up your event, please follow these simple steps:
- First, log in to the RxTro platform. Please ensure that you are signed into your account.
- Next, find the 'Products & services' section. This is where you'll manage your offerings. Navigate to this area within the platform.
- Then, click on 'Manage Events'. This action will open the event creation form where you can input all the necessary details.
- Before you start filling out the form, please take a moment to read 'Preliminary Information'. This section provides important context and guidelines.
- Once you've reviewed the preliminary information, click the 'Next' button. This will take you to the first step of the form, where you can begin entering your event details.
Step 2: Enhance Your Event's Visibility
Let's start by making your event visually appealing!
- Do you have an image to showcase your event? If so, please begin by uploading it here. While this step is optional, adding an image can significantly improve how your event looks to potential attendees.
Now, let's fill in some essential details about your event:
- What is the name of your event? Please provide a clear and engaging title.
- What will attendees learn about? Describe the event's main topics or key areas in brief.
- How will the event be delivered? Indicate the mode of delivery (e.g., online, in-person, hybrid).
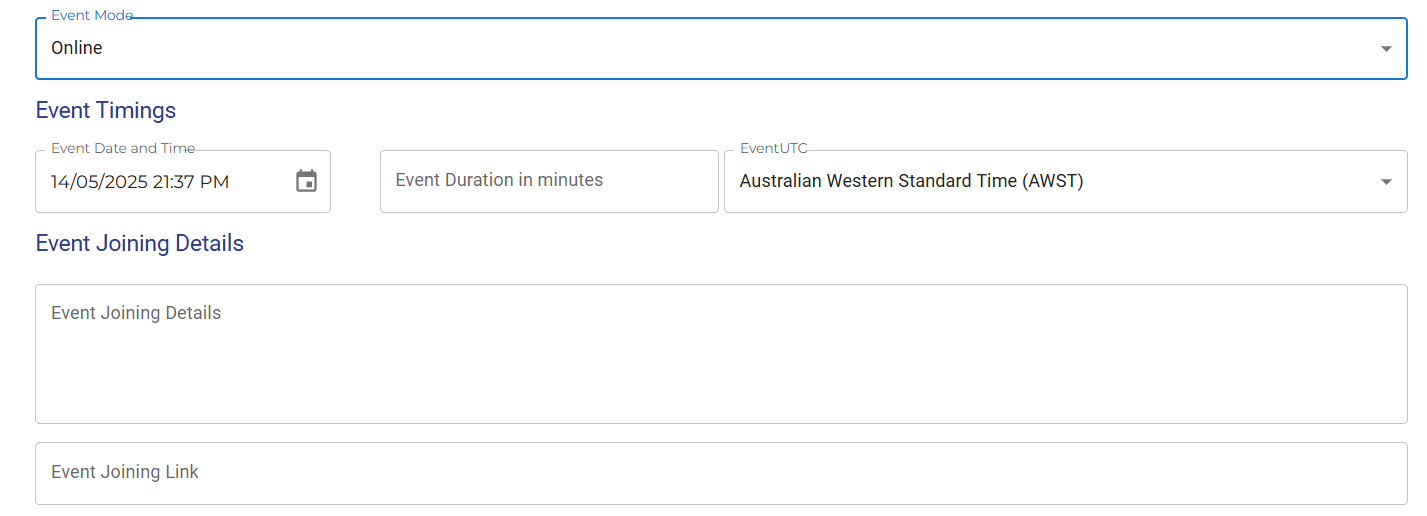
Step 3: Provide Event Specifics
To ensure your event reaches the right audience and attendees have all the necessary information, please complete the following:
- When is the event happening? Enter the date and start time.
- How long will it last? Indicate the event duration.
- What time zone should we use? Selecting the correct time zone is crucial for accurate reminders and broad participation.
- Where is the event
located?
- Offline: Provide the name of the venue and its full address.

- Online: Enter the joining link and any specific instructions, such as registration steps or required pre-event reading.
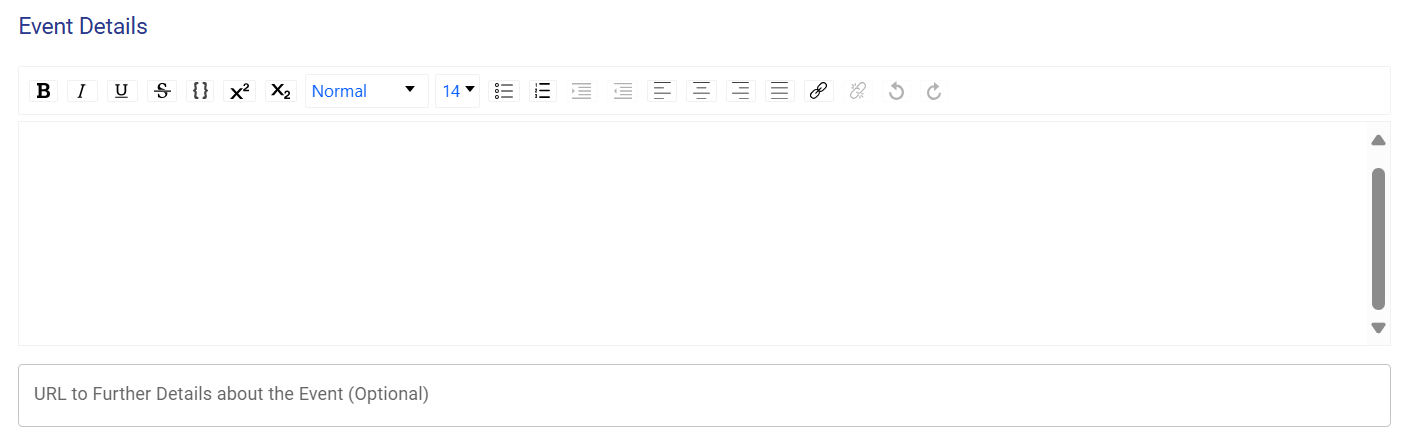
- Tell us more about the event: Use the rich-text editor below to provide a detailed description. You can include the event agenda, information about different sessions, speaker details, and anything else attendees should know.
Step 4: Event Contact Details
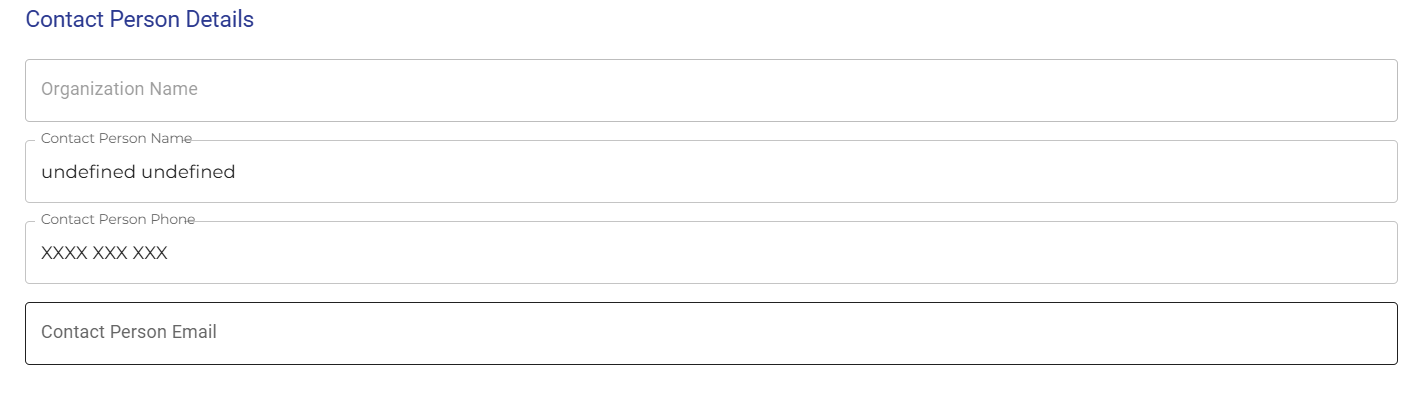
To ensure attendees and interested parties can easily reach out with any questions, please provide the following contact information:
- Organisation: If there's a specific organisation associated with this event, please enter its name.
- Phone Number: Provide a phone number that can be used for event-related enquiries.
- Email Address: Enter the primary email address for event-related communication.
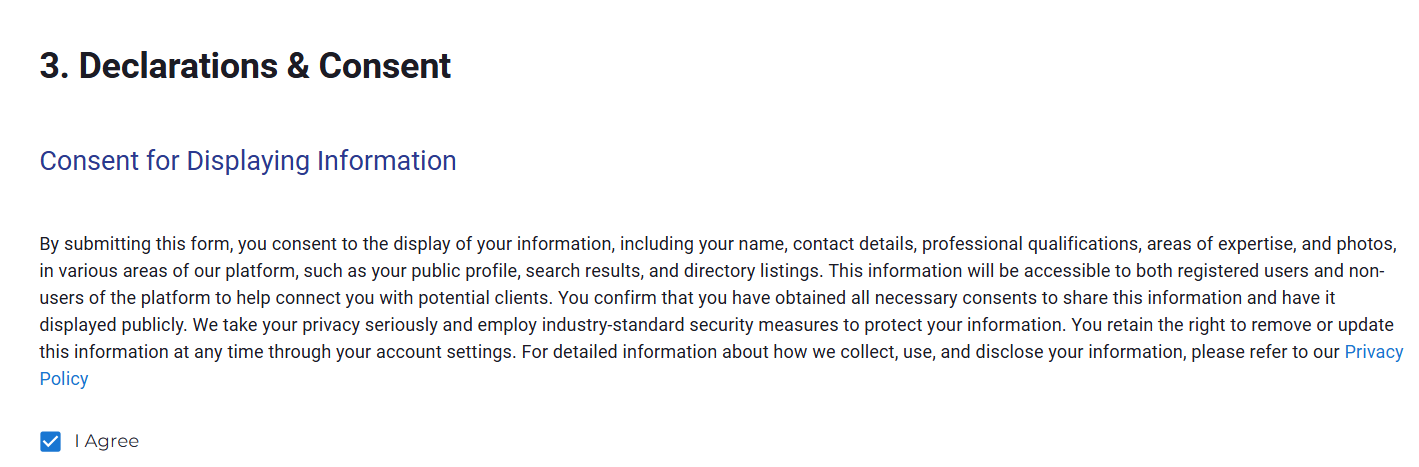
Step 5: Review and Agreement
Before submitting your event, please review the following statements and confirm your understanding and agreement:
Are you prepared to start creating your event?
To begin, log in to RxTro, navigate to 'Products & Services', and select 'Manage Events'. For any questions or assistance, contact us at support@rxtro.com. We would be happy to assist!
Driving meaningful engagement
between clinics and healthcare partners with valuable content.
With recent updates to the RxTro platform, all visitors to
primary care clinics—including pharmaceutical representatives,
allied health professionals, specialists, pathologists,
radiologists, and others—are now required to add relevant content to
their accounts.
This content can include a
practitioner profile, facility, programme, product, or event and
must be attached whenever an appointment is created with a
clinic.
Let us look at how it works:
Step: 1
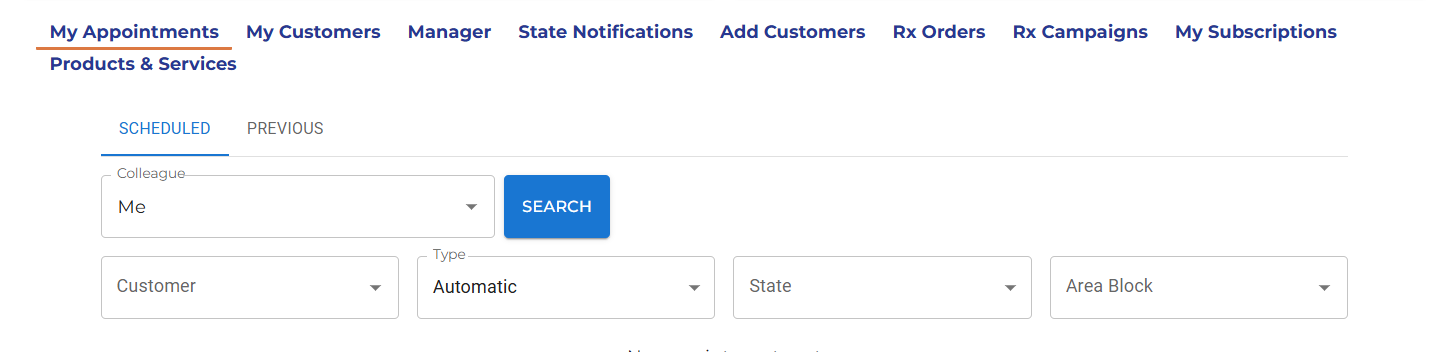
After you log
on to RxTro platform, navigate to: My Appointments
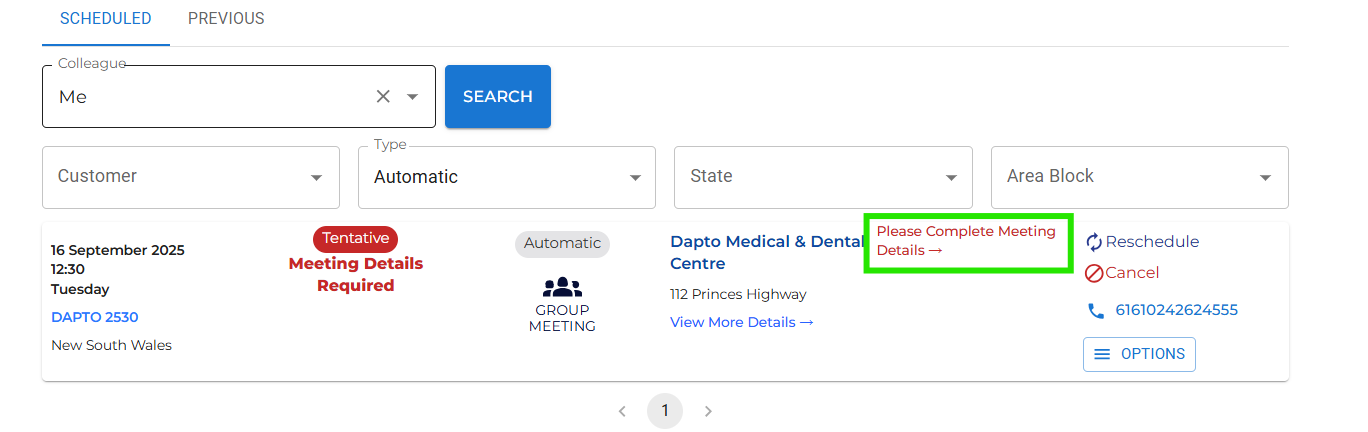
Step: 2
If you have booked an appointment for any day after September 1, 2025, you will be prompted to add meeting details. A 'red tag' will show up that says 'Meeting details required'.
Click 'please complete meeting details' to enter your details.
Step: 3
Just enter the relevant meeting details on the form that opens up and click 'SAVE' to activate/keep your existing appointments. If you have already UPLOADED YOUR CONTENT on RxTr0, you can select ONE or MORE content from the drop-down menu.
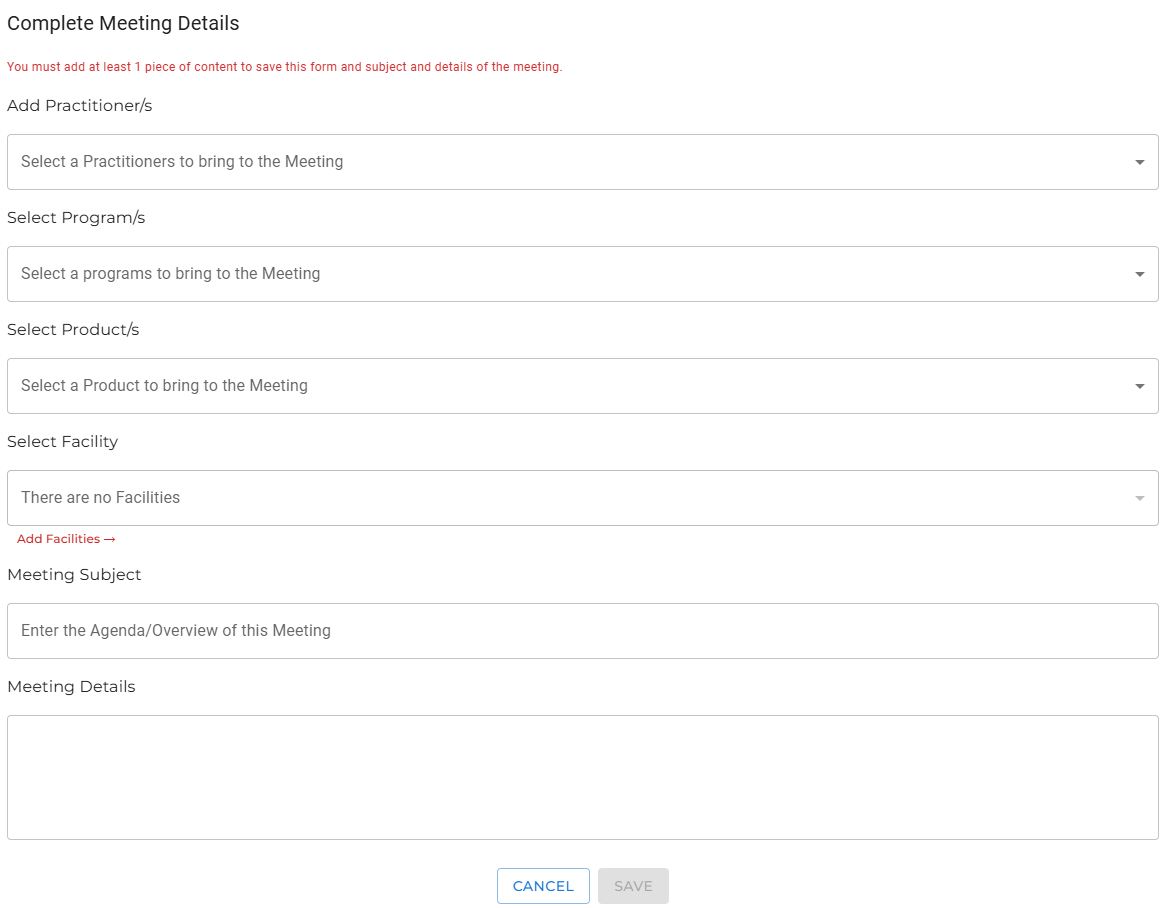
[Please note: The drop-down menu with your content details will only appear if you have already uploaded content to RxTro.] To keep your appointments active, please upload your content if you haven't already.
To upload content, log in to your RxTro account, go to Products & Services, and select 'Manage – practitioner, product, program, facility, or event' to upload.
Step: 4
After saving the meeting details, your appointments will show up as “Appointment Made” in green. This confirms that your appointment is active and ready, so you can proceed as planned with your clinic visit.
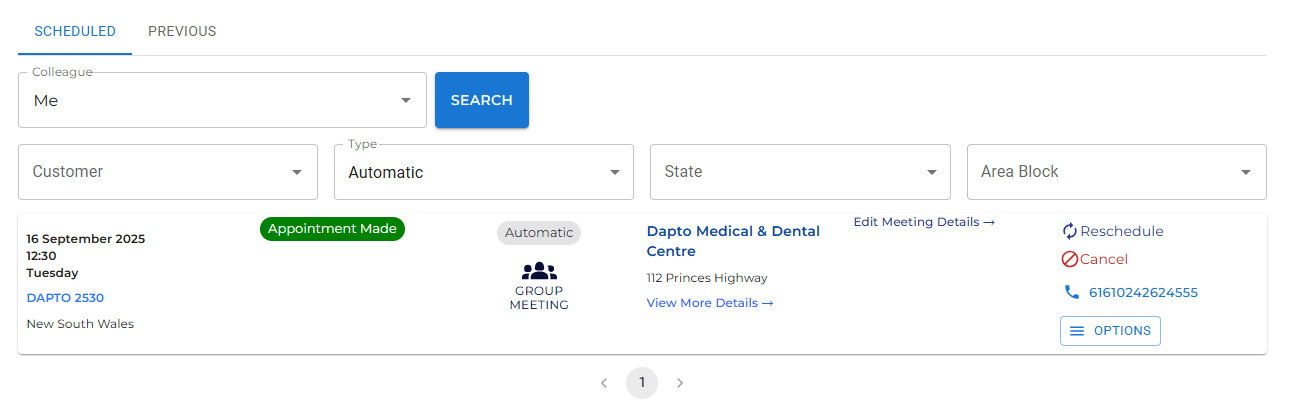
Once your appointment shows as “Appointment Made”, you’re ready to go. For the best experience, keep your content updated in RxTro.
If you need assistance,
please reach out to our support team.
Do you want to book your first GP appointment
on RxTro?
You are in
the right place. Before you begin, please ensure that you have
completed the required setup steps.
This guide outlines the essential steps in the correct sequence so that you can activate your subscription and proceed to booking your first GP appointment.
Before you start: Quick checklist
1. Confirm that you have added your territory.
To see appointment opportunities, you must first set your territory (also known as your catchment area). This ensures that RxTro displays clinics located in your intended operational region.
If you have not added your
territory, please refer to:
➡
How do I add my territory on
RxTro?
2. Confirm that you have added your customers.
Once your territory is set, you must add the GP clinics that you wish to target. You can only see the appointment slots of clinics which are added under 'My Customers'.
If you have not completed this
step, please refer to:
➡ How do I add customers (GP
clinics) to my profile?
3. Go to “My Customers”
Navigate to:
Side Menu →
My Customers
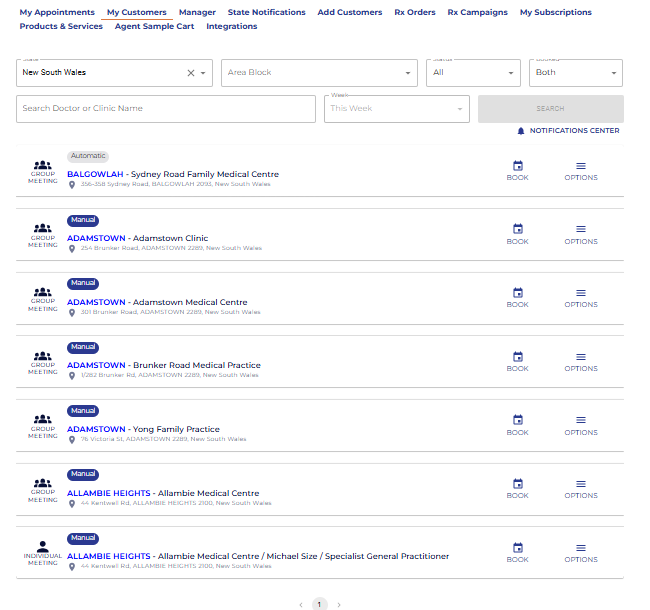
This section displays all clinics that you have added to your territory. From here, you can:
-
View your selected clinics
-
Explore available appointment slots by clicking on 'BOOK'
You will be able to see
the availability for a particular clinic in the next screen:
Clinic booking types on RxTro
RxTro supports two types of clinics:
Automatic clinics
These clinics allow appointments to be booked
directly through RxTro.
If
appointment slots are visible, you can submit a booking request
within the platform.
Manual clinics
These clinics may display appointment
availability on RxTro, but bookings cannot be completed through the
platform.
For Manual
clinics, you can view available times and then contact the clinic
directly to book the appointment.
4. Understanding the “No availability to book” message
If you see a message stating “No availability to book”, this can occur for one of the following reasons:
-
No available slots for the selected dates
The clinic may not have availability for the dates you selected, or they may have set specific preferences regarding when and with whom they accept visits. -
The clinic does not share availability on RxTro
Some clinics choose not to publish their availability on the platform.
If the clinic does not share availability on RxTro, you may contact the clinic directly to book an appointment based on their availability.
5. Activate your RxTro subscription
To book any GP appointment through RxTro, your account must have an active subscription.
Navigate to:
Plans &
Pricing → Choose Plan
RxTro offers flexible subscription plans suitable for:
-
Pharmaceutical representatives
-
Specialists
-
Allied health professionals
-
Diagnostic and pathology providers
-
Individual practitioners and MSMEs
A 7-day trial period is available, allowing you to explore the platform and understand the booking workflow before committing to a paid plan.
6. Check for enterprise subscription coverage
If you belong to a company or medical organisation, your organisation may already have an enterprise subscription that includes your access.
Before purchasing an individual plan, please confirm with your organisation whether your subscription is already covered.
7. Book your first GP appointment
Do you have an active subscription with RxTro? Then congratulations! You can go ahead and book your first appointment:
-
Navigate to My Customers
-
Select a clinic
-
Review available appointment slots
-
Choose a suitable date and time
-
Submit your booking request for Automatic clinics, or contact the clinic directly for Manual clinics
Your scheduled and pending appointments will appear under My Appointments.
Understanding “Tentative” meetings
If your meeting status appears as
Tentative, there is
no cause for concern.
This simply
means that additional meeting details are required before the
appointment is confirmed.
To proceed, add the required meeting details and continue preparing for a productive first appointment.
To learn how to add meeting
details, please refer to:
➡
How do I add meeting
details?
Are you planning to place item requests for sample packs and patient support materials directly through your RxTro account?
Are you curious about the contents of these item requests?
These items typically include product samples, patient guides, starter packs, and other approved support materials that most clinic visitors share with doctors. You can find them all on RxTro and directly order them through a simple and streamlined process.
Before you place an item request
Before starting, make sure that:
-
Your doctor list is up to date
-
The relevant doctor has been added to your Medical Staff list
You will be required to select a doctor during checkout, so this step is essential to complete your request.
How to place an item request for patient support materials?
1. Log in to your RxTro account
2. From the side navigation bar, click 'Item Requests'
3. Browse the list of available items (listed in alphabetical order)
4. Under the Quantities column, click
the empty box next to the item you want
5. Enter the required quantity for each item
6. Once all items are selected, scroll down and click Add to Doctor’s Bag
Review and submit your request
1. Click Doctor’s Bag to review the selected items and quantities
2. If everything looks correct, click Checkout
3. Confirm the shipping details
4. Select the relevant doctor from the
drop-down list
5. Click FINISHED to finalise your item request.
Check the status of your item request
-
Go to Item Requests and click Orders
-
Locate the relevant order to view its status (for example, pending or delivered)
Important note
If the required doctor does not appear in the drop-down list, you will need to add the doctor to your list before completing the request.
What are CPD slots on RxTro?
CPD slots are time blocks created by clinics on the RxTro platform to host in-clinic Retro CPD Education sessions.
These sessions take place at the clinic, allowing GPs to participate in CPD activities without leaving their workplace.
Why should clinics create CPD slots?
Creating CPD slots enables clinics to support GP education while reducing common barriers to CPD participation.
Key benefits for clinics:
-
Enables in-clinic CPD delivery
-
Reduces travel and time burden for GPs
-
Supports completion of mandatory 50 CPD hours
-
Encourages regular, structured learning
-
Improves GP engagement and retention
-
Connects clinics with verified CPD providers
How does RxTro facilitate in-clinic CPD?
RxTro's in-clinic educative sessions are designed to help GPs complete and log CPD hours in a structured and practical manner.
These sessions are coordinated through the platform and are:
-
Conducted at the clinic
-
Delivered by approved CPD providers
-
Scheduled using CPD slots created by clinics
How do CPD slots support GPs?
By participating in Retro CPD Education sessions at their clinic, GPs can:
-
Complete CPD activities without leaving the workplace
-
Avoid travel and conference-related costs
-
Attend shorter, more frequent educative sessions
-
Integrate CPD into routine clinic schedules
Who can create CPD slots?
CPD slots can be created by:
-
Primary care clinics
-
Practice managers or clinic administrators
-
Clinics with an active account on the platform
How often can CPD slots be created?
Clinics can decide:
-
How frequently CPD slots are offered
-
The duration of each session
-
The timing that best fits clinic operations
There is no fixed requirement on frequency or format.
Are clinics required to create CPD slots?
Creating CPD slots is optional, but recommended for clinics that want to actively support GP CPD participation.
What happens after a CPD slot is created?
Once a CPD slot is created:
-
Approved CPD providers can connect with the clinic
-
Sessions are scheduled based on mutual availability
-
In-clinic educative sessions are delivered as planned
Creating CPD slots allows
clinics to bring CPD education into the workplace, making it easier
for GPs to meet CPD requirements through in-clinic educative sessions.
Check out this page
for more details.
Are you a primary care clinic looking to get started on RxTro? This quick start guide walks you through creating your clinic account, from first-time login to completing your clinic profile.
Step 1: Start creating your account
1. On the RxTro homepage, click 'log in'.
2. Click Log In
3. On the login page, select 'Create account' if you are trying to create a new clinic account.
| For existing users:
If you already have an RxTro account, log in using your email address and password. If you have previously created an account using the same email address, you may need to click Forgot Password to retrieve your password and log back in. Once logged in, you can continue updating your clinic preferences. |
Step 2: Enter your details
You’ll be asked to provide:
-
First name
-
Last name
-
Mobile number
-
Email address
Click Create Account.
Your login credentials, including a temporary password, will be sent to the email address provided.
Step 3: First-time login and Terms of Use
-
Check your email and copy the password provided
-
Return to the RxTro login page
-
Enter your email address and password
-
Click Sign In
-
Read the Terms of Use carefully
-
Click I Agree to continue
Step 4: Registration questions (clinic pathway)
RxTro supports two types of users:
-
Clinics and healthcare practices that manage appointments and receive visitors, and
-
Clinic visitors use the platform to request meetings and exchange information with healthcare professionals.
RxTro asks a few short questions during registration to ensure the correct setup experience. Your responses help route you to the appropriate pathway.
You will now be guided through a brief registration process.
Question 1:
Are you interested in scheduling meetings to
discuss your offerings?
→ Select No
This option is intended for clinic visitors who request meetings. Clinics should select No.
Question 2:
Are you
responsible for managing the doctors’ appointments at the
practice?
→ Select
Yes
(This applies to practice managers, admin staff, or anyone responsible for managing clinic schedules.)
Step 5: Find or add your clinic
You will next be asked whether your clinic is already listed.
-
Begin typing the first letter(s) of your clinic name, or
-
Scroll through the list to check if your clinic appears
If your clinic is listed:
-
Select Yes
-
Choose your clinic from the list and proceed
If your clinic is not listed:
-
Select No
-
A form will open, allowing you to add your clinic details
Enter the required information carefully, including:
-
Clinic name
-
Address
-
Clinic phone number
-
Clinic fax
Once complete, click Next.
Step 6: Review and confirm your details
You will now see a summary of the information you’ve entered, including:
-
Clinic name
-
Your name and title
-
Email address and contact details
If you are not a doctor, you can update your title at this stage.
Please review all details carefully before clicking Finish.
Congratulations! Your clinic account is now created.
What happens next?
Once your clinic account is created, you can continue setting up your clinic by:
-
Adding your medical staff, including doctors and relevant healthcare professionals
-
Setting up clinic operating hours
-
Defining appointment availability, including appointment types and time slots
-
Managing meeting preferences for clinic visitors
-
Placing and tracking item requests, such as sample packs and patient support materials
Separate guides cover each of these steps, allowing you to complete your setup at your own pace.
On RxTro, your Territory or Catchment Area is the geographic location where you intend to focus your primary care interactions.
Adding Territory or Catchment area to your account is the first step towards booking your GP appointment. Fixing your territory to your profile determines the area and the GP clinics you want to target based on State, Area Block, and Suburb.
This step is essential since without adding clinics to your Territory, you will not be able to see slot availabilities or Book your GP appointment.
Let's get started!
1. Log in to your RxTro account
Use the login details sent to your email, or the personal password you created via Forgot Password.
Once logged in, you will land on your dashboard.
2. Navigate to “Add Customers”
At the Sub-navigation bar, click: "Add Customers"
This is where you define your Territory by selecting your preferable catchment area and clinics you want to target.
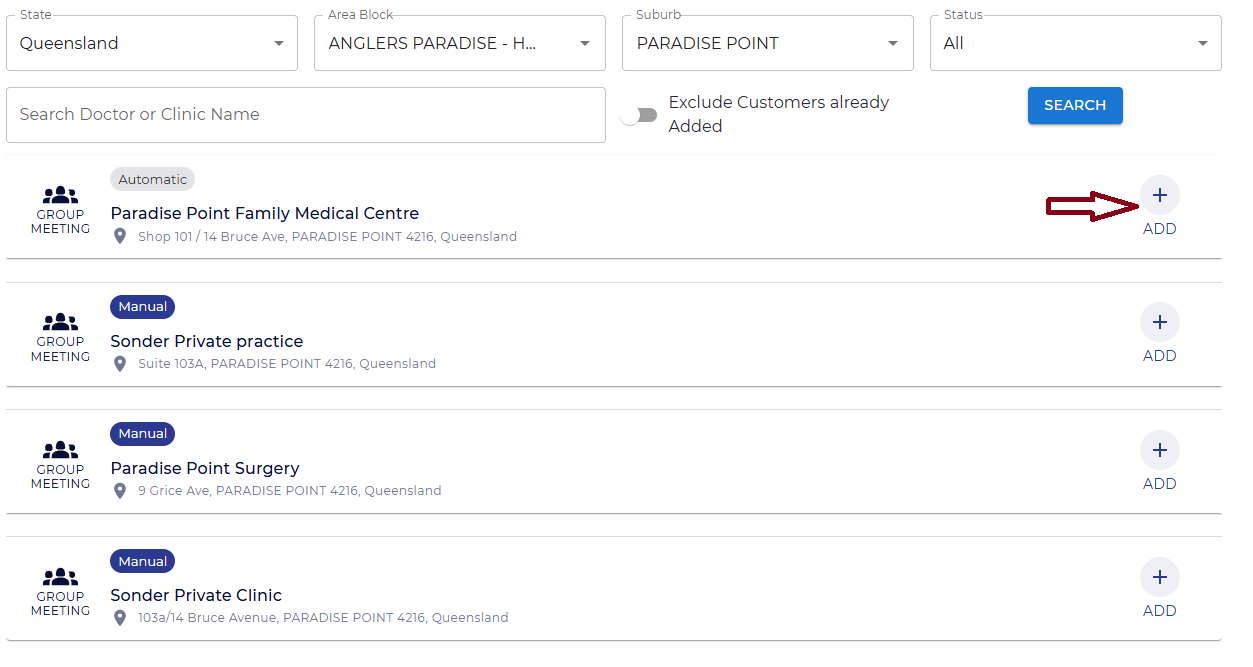
3. Select your Territory (State, Area Block & Suburb)
From the dropdown filters at the top of the Add Customers page, select the locations where your target GP clinics operate.
You can filter by:
-
State
-
Area Block
-
Suburb
-
Status (All, Available, Blocked, Manual)
For your convenience, RxTro has subdivided each State into Area Blocks, making it easier for you to select and refine your Territory or Catchment Area without searching through the entire state manually.
If you notice that an Area Block or specific location is missing, please let us know and we will ensure it is added to our system.
4. Search for a specific clinic or doctor
If you cannot find the clinic or doctor you are looking for using the filters, simply use the search bar provided.
Type the doctor’s name or clinic name into the search box below.
RxTro will display the clinic the
doctor works in, along with all available details so you can add them
to your Territory.
5. Add the clinic to your Territory
Once you locate the clinic you want (either through filters or by using the search bar) you can add it to your account.
Click the “+” (Add) icon next to the clinic name.
This will add the clinic to your
Territory, and it will appear under My Customers as one of your preferred customers.
You can repeat this process to add as many clinics as you need.
6. Add more clinics as needed
After you click the Add (+) button, the clinic
is saved to your Territory.
You
can continue browsing the list or adjusting your filters to find other
clinics in the same area.
Add as many clinics as you want — there is no limit.
7. Review your clinics under “My Customers”
Once you have added your preferred clinics, go to:
Top Menu → My Customers
Here, you can:
-
View all clinics added to your Territory
-
Confirm that the correct clinics are listed
-
Explore available appointment slots (if any are visible)
My Customers is where you will come to book your appointments, and it serves as your personal directory of all the GP clinics you have added to your Territory.
Ready to book your first appointment? If you have already added your territory, simply head to My Customers and explore 'How to activate my Rxtro account & book my first GP appointment?'.
Follow these steps to create your RxTro account and begin your onboarding journey. This process includes verifying your email, completing your registration form, and setting up your subscription.
1. Go to RxTro.com and click “Join RxTro”
Visit www.rxtro.com and select 'Start
Connecting' from the homepage.
This opens the registration page.
2. Enter your details
When the form opens up, fill-in the following information to create your account:
-
First name
-
Last name
-
Email address
Once complete, click “Create an account.”
3. Complete the Registration Questions
After clicking Create an account, you will be guided through a series of short questions to help RxTro understand your role and organisational details.
You must complete all steps before your account can be created.
a. Confirm your intention to schedule meetings
You will be asked:
“Are you interested in scheduling meetings to
discuss your offerings?”
Click YES to continue if you want to book a GP
appointment or meet GPs to discuss your offerings.

b. Key-in your organisation details:
You will first be asked to identify your organisation.
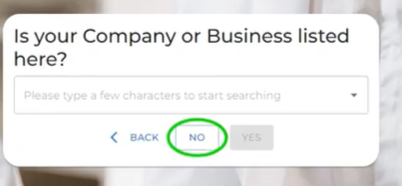
- If your organisation is listed, click 'yes' and it will appear as you begin typing. Select from 4000+ organisations listed in our drop-down menu.
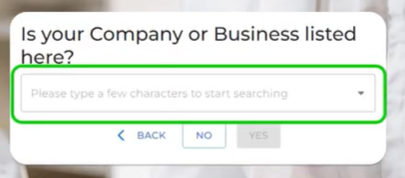
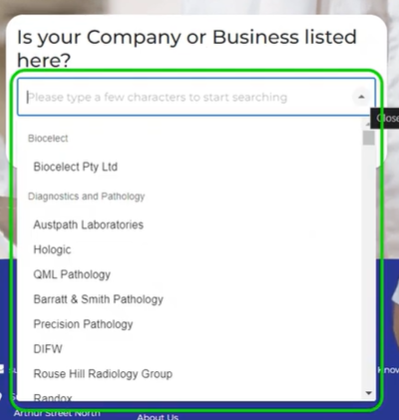
-
If your organisation is not listed, click 'NO' you can enter it manually in the same field.
C. Review your information
After entering your details,
RxTro will display a summary of the information you provided.
Review this carefully to ensure
everything is correct.
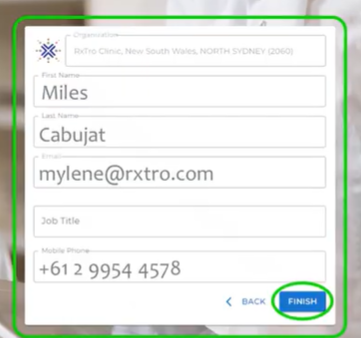
Once all details are correct, click Finish to submit your information.
If you need to make changes, use the Back button.
4. Check your mail for login details:
After clicking Finish, RxTro will send
your login details to
the email address you provided during registration.
This email includes:
-
Your username (email)
-
A temporary password
-
A link to log in to RxTro
If you do not see the email, check your Spam or Junk folder.
5. Create your personal password
Once you receive the temporary password, we strongly recommend that you immediately select the “Forgot Password” option on the login page.
This allows you to:
-
Create your own secure password
-
Ensure your account remains protected
-
Avoid using the system-generated temporary password long-term
6. Log in to view your account dashboard
After you log in using the temporary password (or after creating your own password via Forgot Password), you will be taken to your RxTro dashboard.
Here, you will see your profile card, which displays:
-
Your name
-
Your organisation
-
Your role / job title
-
Your email address
-
Your mobile number
At this stage, your account is active, and you can proceed to complete the remaining setup steps such as:
-
Add your preferred catchment area/territory & customers
-
View primary care clinics with open meeting slots in that area
-
Setting up your Subscription by selecting your appropriate pricing plan
-
Booking meetings
This guide explains how to set up and configure Halo Link in RxTro, enabling seamless synchronisation of appointments from RxTro to Best Practice.
Please make a note of the clinic's
BP Site ID number. This can be found under the
tab:
Help/About/Site ID
Software Requirements
- The most recent version of Java.
1. Best Practice – Configuration
1.1 Enable RxTro–Halo
-
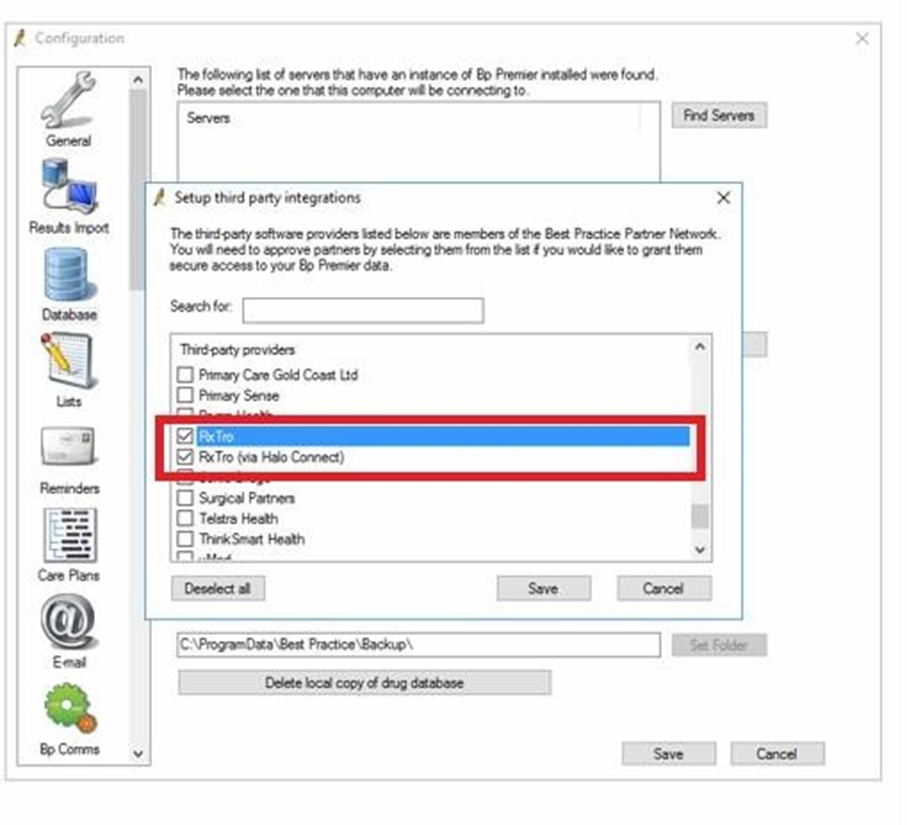
In Best Practice, go to Settings > Configuration > Database > Set Up Third Party Configuration.
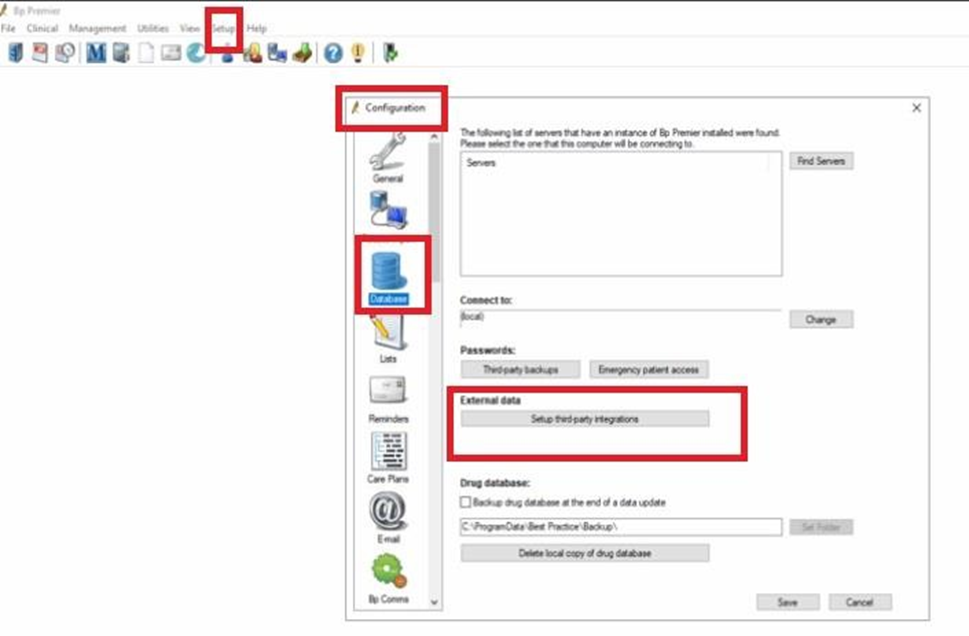
- Tick RxTro–Halo
Please make a note of the clinic's BP Site ID
number. This can be found under tab:
Help/About/Site ID
Tip: Installing Halo Link
If you are unable to validate your BP Site ID in RxTro, it usually means Halo Link has not been installed on the server.
👉 Please refer to Best Practice’s official Halo Link installation guide for full setup instructions and system requirements.
⚠️ The integration will not work unless Halo Link is installed and running correctly.
2. RxTro – Setting Up the Integration
2.1 Enable Appointment Sending
-
Log into the clinic’s RxTro account.
-
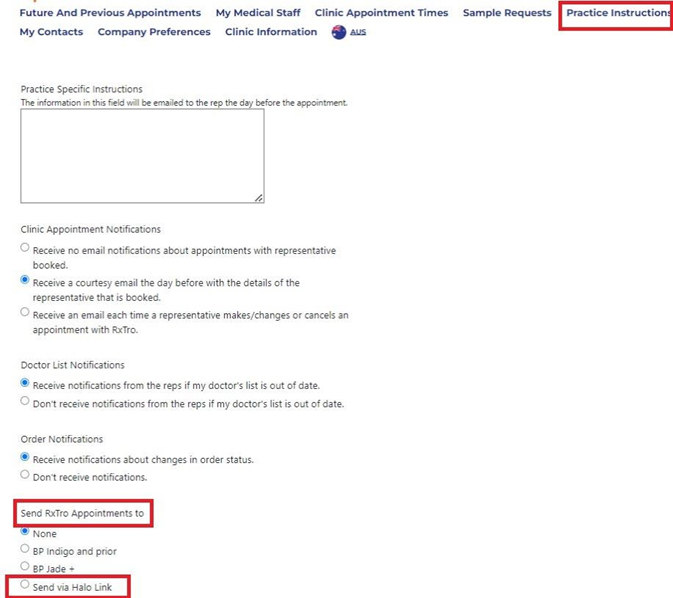
Go to the Practice Instructions tab.
-
Under Send RxTro Appointments to, select Send Via Halo Link and click Save.
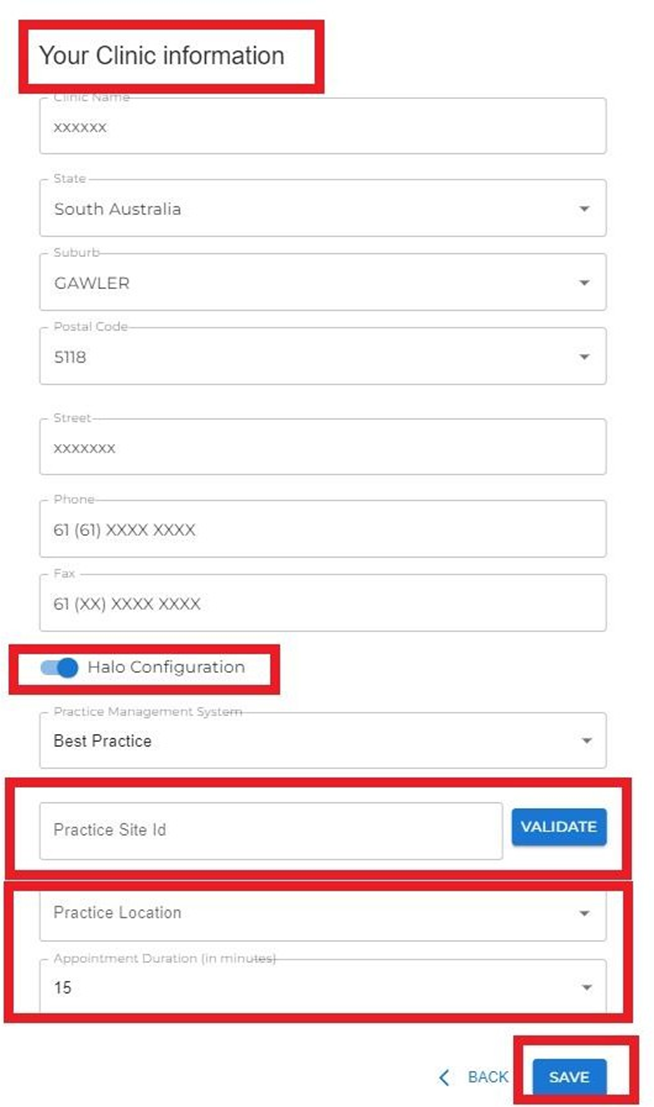
2.2 Configure Halo in RxTro
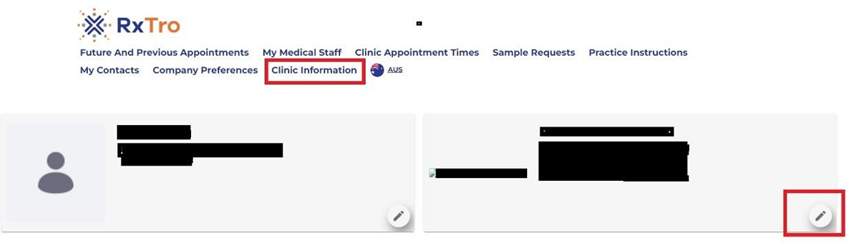
-
Go to the Clinic Information tab.
-
Click the edit icon under the clinic’s information card.
- Slide the Halo Configuration toggle to the right and click Save.
-
Enter the BP Site ID number and click Validate.
-
Select the Practice Location (appears only if the Site ID is valid).
-
Set the appointment duration time and click Save.
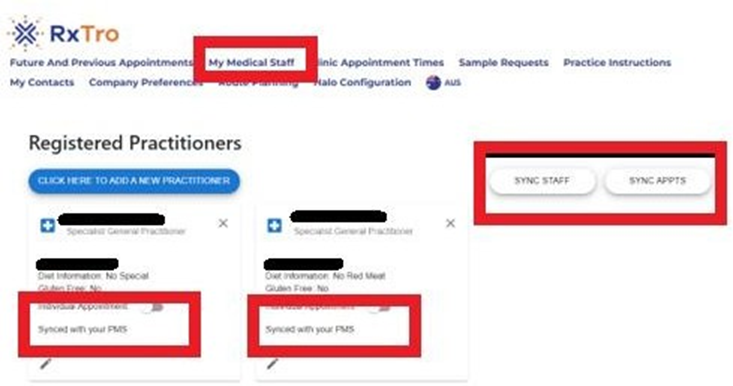
2.3 RxTro – My Medical Staff Syncing
-
In RxTro, go to My Medical Staff.
-
Click Sync Staff and Sync Appointments.
-
Ensure each doctor shows as synced with your PMS.
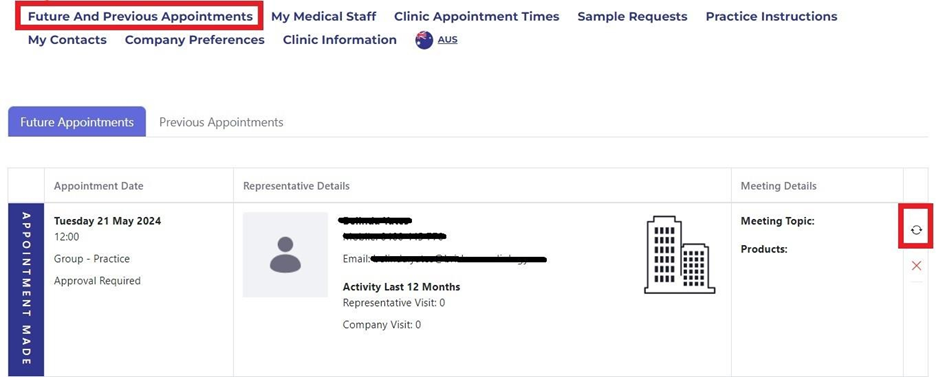
2.4 RxTro – Future Appointments Syncing
-
In RxTro, go to Future Appointments.
-
For each appointment, toggle Resend to your PMS.
-
Cross-check in Best Practice that the appointments appear on the correct day, marked as online appointments.
Note:
In case of any errors, troubleshoot using the below steps as applicable:
-
Site ID Invalid (Step 2.2):
If the Site ID does not validate, the clinic has not installed Halo Link correctly. Reinstall using the official instructions, then retry. -
Doctors Not Syncing (Step 3.3):
Check that the doctor’s AHPRA number matches exactly in both Best Practice (Setup > Users) and RxTro. If mismatched, update and resync.
Conclusion
Once you have completed these steps, your clinic will be fully set up—with Best Practice and RxTro linked through Halo Connect so that rep appointment bookings flow smoothly between the two systems.
If things are not syncing, or you have problems with it, the first step is often the simplest: try resetting the connection and check again.
Also, keep in mind that system upgrades (whether in RxTro, Best Practice, or your server) can sometimes interrupt the link. This is normal and can usually be resolved quickly.
And remember—RxTro is always your most up-to-date record of rep bookings, so if there’s ever a mismatch, rely on RxTro first.
When should I cancel an appointment?
If you are unable to attend a pre-scheduled appointment with a pharmaceutical rep, you can cancel it directly from your RxTro account. The rep will be notified automatically via email.
To cancel a rep appointment
-
Log in to your RxTro account.
-
Go to Future Appointments.
-
Find the relevant appointment, click the red ❌, and select Cancel Appointment.
-
An automatic email is sent to the rep confirming the cancellation.
-
-
After cancelling, click the calendar icon next to the appointment time and choose Block this date.
-
Enter a brief reason, then click Save.
-
This blocks that date and time so no other pharma reps, allied health professionals, or specialists can book that slot.
-
To cancel multiple appointments (bulk block-out)
If you need to cancel several appointments:
-
Repeat steps 1–4 above for each appointment you want to cancel.
-
Once all required appointments are cancelled, go to Clinic Appointment Times.
-
Scroll to Clinic Block Out Dates.
-
Add the date range you wish to block and click Save.
-
This ensures no new rep appointments can be made during the blackout period.
-
Final checks & tips
-
Review your calendar to confirm all changes are updated.
-
You can reschedule or nominate rep appointments later by selecting a new time that suits your availability.
 AUS
AUS can
can